Showing posts with label tutorial. Show all posts

Tuesday, August 20

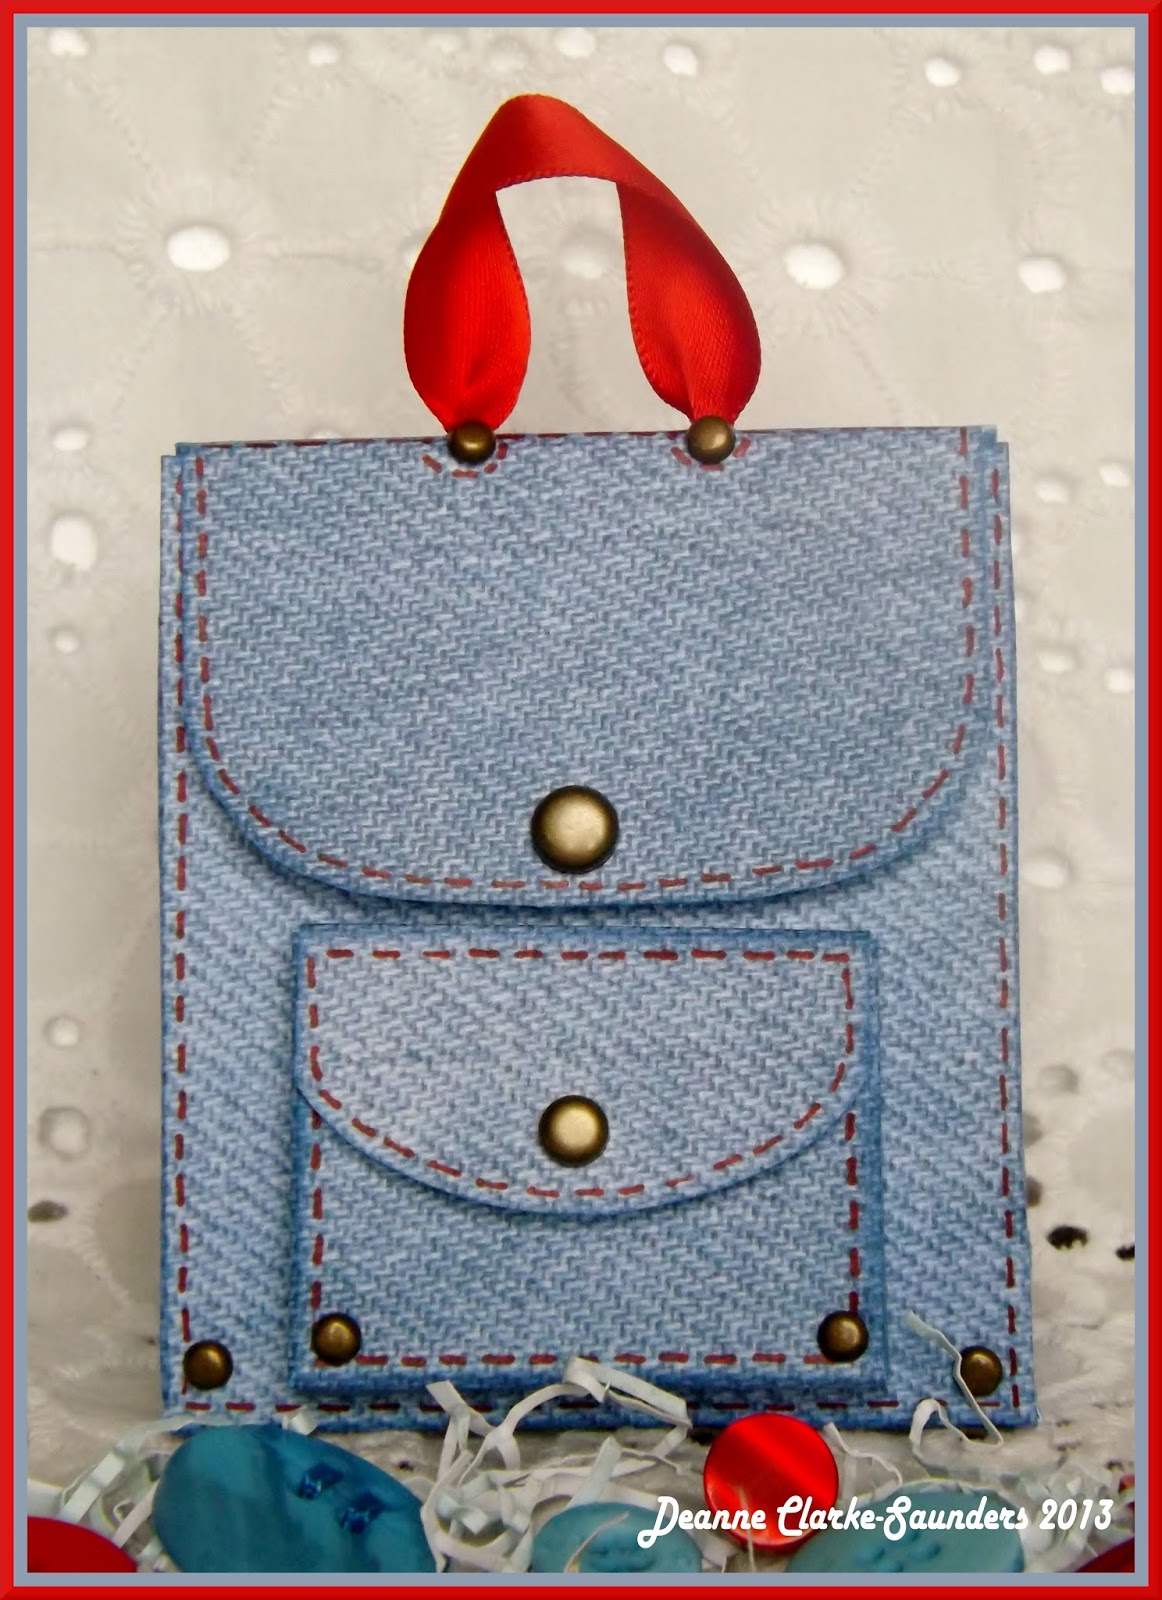
Denim Backpack

Here's another backpack I made using the tutorial I posted HERE
This time I printed off some paper that looked like denim so the backpack will look like it was made of jean material. I added stitching and brads as added touches. I think it's so adorable!!!


side view

back view
 Challenges:
~Fairies-back to school
~Pink Elephant-anything but a card
~Squigglefly-ribbon/twine
~Top Tip Tuesday-2 things beginning with your initial (D is for denim paper and distressing ink)

(¨`•.•´¨) Hugs
  `•.¸(¨`•.•´¨) from the
(¨`•.•´¨)¸.•´ Heart
 `•.¸.•´ ~DEANNE~
. . . psst, don't forget to check out my {PIN}spirational Challenge Blog !

Friday, August 16

Back to School TUTORIAL

Backpacks


Whew! I managed to make, not just one, but, TWO backpacks today!
I searched the web for ideas and utilized this pattern and idea and made a tutorial for you.
I found there was no tutorial out there that had good step-by-step instructions.(Now, I didn't look very long, either, because I wanted to jump right in and try it!!)

You will need:
~1 pc. of cardstock (8 1/2 X 11 is good)
~Velcro
~Scissors
~Ruler
~Something to score your paper with
~Patterned paper (if you want to add it to the flaps)
~Glue and/or Sticky Tape
~Ribbon (either 1 pc. of 16 inches long OR 1 pc. of 12 inches and another 1 pc. of 4 inches (if you want the straps to be a different color from the hanging strap)
~Distressing ink (optional)
~Other embellishments as you desire, such as brads or buttons

Here are the pattern pieces:
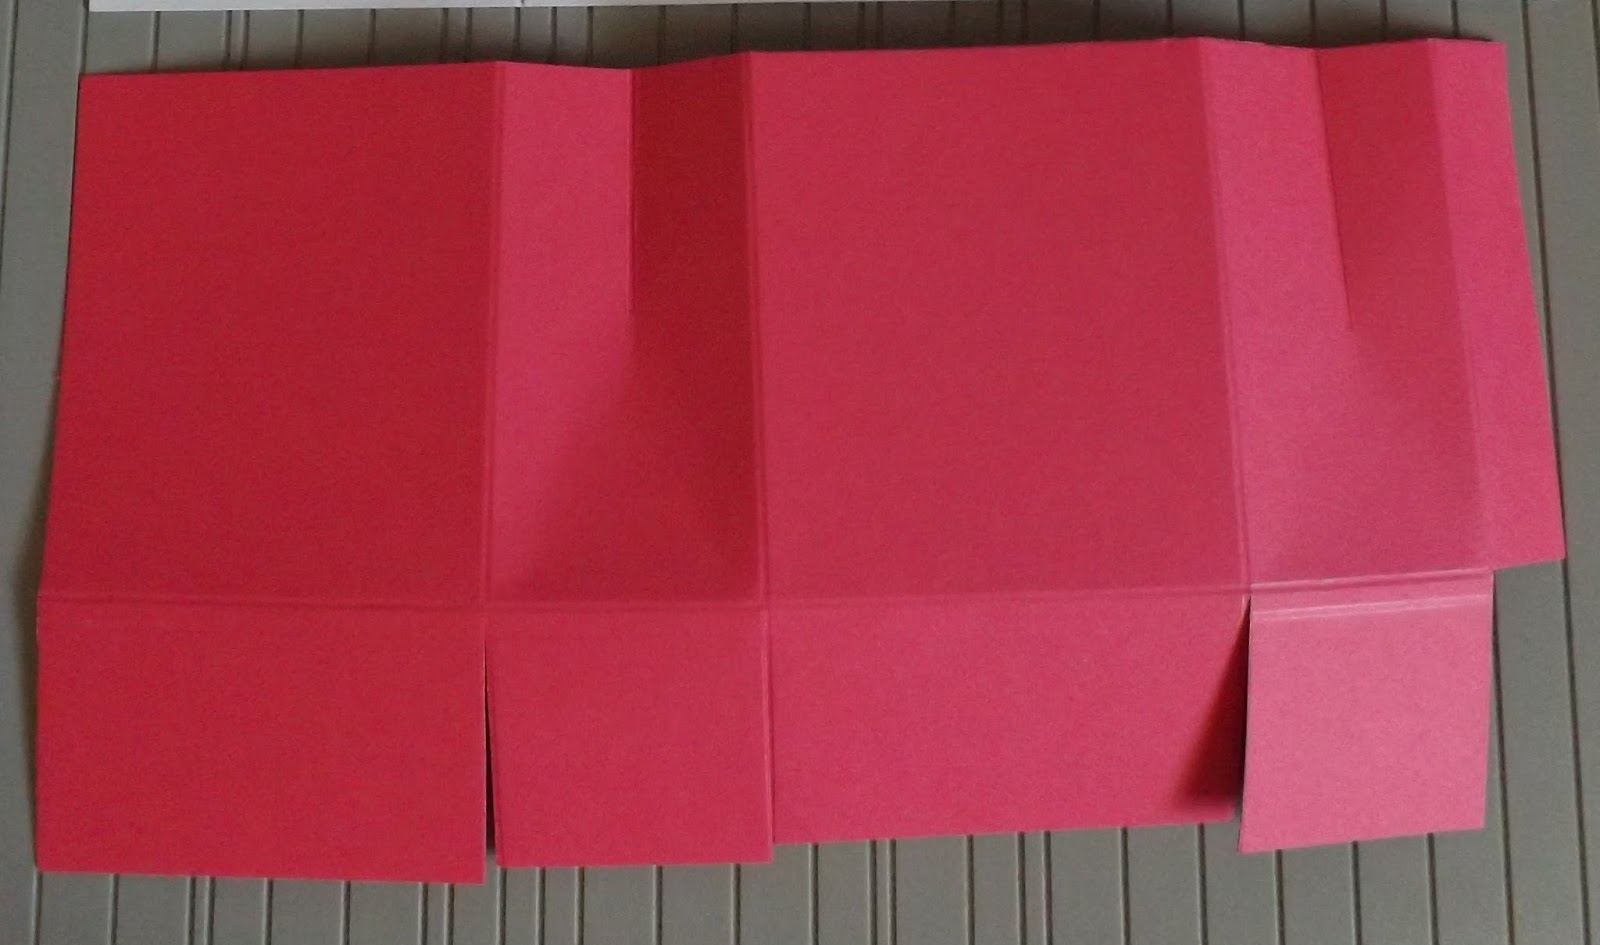
The cardstock is cut 10 1/4 in. X 5 1/4 in.
Score as it shows in the picture:
At 3 in. , 4 3/4 in. , 7 3/4 in. and 9 1/2 in.

Then score lengthways at 3 1/2 in.
Also score a couple of small lines so the backpack will close more easily.
Cut where it shows. Punch holes for the ribbon to go through.

Here are the smaller pieces.

Backpack flap.
It is 2 15/16 in. ( a little smaller than 3 in. so that it fits snugly onto the back of the backpack.) X 2 1/4 in.
Score a fold line at 1/2 in. Round the edges. Punch holes for ribbon.

Front pocket flap.
It's 1 1/2 in X 2 in.
 Score at 1/2 in. and 1/4 in.
Round edges.
The part that says "Glue to backpack". That's done later.

Front pocket
3 in X 2 in.
Score three edges at 1/2 in and 1/4 in.
Cut out the bottom corners as shown.

Here are my pieces cut and folded.

 *I forgot to take a pic of the pocket after it was cut,oops!


At this point you can distress the edges of your pieces. This is totally optional! But I can't help myself, I HAVE to distress!!!


The next step after you have all your pieces cut and ready to put together is to make sure the holes line up for the backpack pattern and the backpack flap. Position the flap to the INSIDE of the backpack pattern and punch holes, if you haven't done it up to this point.
Then glue the flap to the backpack pattern.


Be sure and glue the flap to the INSIDE of the backpack pattern.
You don't want to see where the flap was glued to the OUTSIDE of the backpack.

Now you will want to cut your ribbon into two 6 in. pieces and a piece that is 4 in. The 6 in. pieces will be for the shoulder straps and the 4 in. piece is the hanger piece of the backpack.

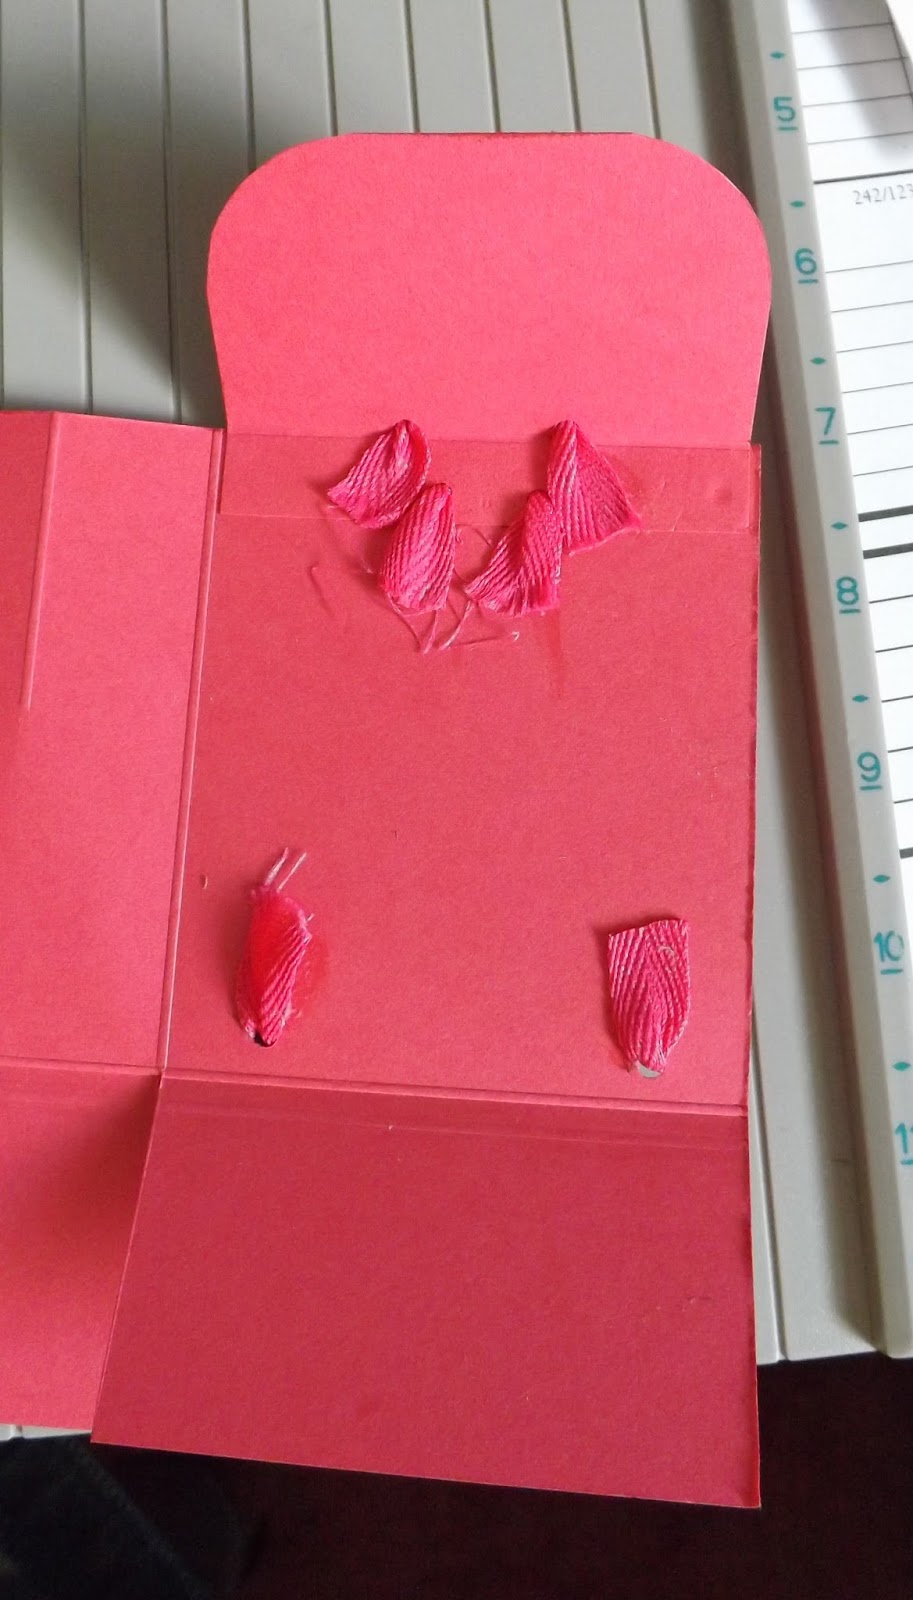
Poke the 6 in. pieces through the holes at the back of the pattern and turn over and glue the pieces down as shown.


Then using the 4 in. piece, push it through the top holes.

Glue the pieces down. It will look like this on the inside.

While that is drying, you can get the front pocket ready.
See where the 2 pencil dots are? This is where you will need to put glue.
This is the INSIDE of the front pocket.
 Fold up the bottom piece and glue it.

This is what it will look like when glued.

Now you will need 2 more drops of glue at the top to glue on the pocket flap.

This is what it will look like when glued.

That is ready to go on the front of your backpack. But first you must glue the backpack together!
Fold it all together and glue it in place, making sure that the flap is on the inside. You don't want to see where the flap is glued to the back of the backpack.

Fold the flaps in at the bottom and glue in place. This is what you now have as your backpack is starting to come together and actually start looking like a backpack!

Fold the flap down in the front and add the velcro to the flap and backpack so you can open and close it. At this time you can add a brad or some embellishment (such as a button)

Then add glue to the back of the front pocket and glue it to the front of your backpack. Add velcro to this little pocket as well so it can be opened and closed. Again, add a brad or button, if you like.

This is what it's like when it is done! So DARN CUTE, isn't it!!!!!


I loved it sooooo much that I just had to make another one! 

Wouldn't it be neat if the pieces were stitched?? I have so many ideas racing through my head that I could do with this pattern!!! Gonna have some fun. Will have to make some more this weekend!!

Challenges:
~Created With Love-back to school
~Make My Monday-3D
~Party Time Tuesdays-back to school
~Crafty Creations-make 2 of something
~Paper Pretties-school
~Paper Shelter-ribbon
~Penny's Paper-Crafty-ribbon
~My Heart Pieces-metal (brads)
~3 Girl Jam-back to school ( and ribbon)
~Sister Act-anything goes

If you have any questions about this tutorial,please email me (email in sidebar).

(¨`•.•´¨) Hugs
  `•.¸(¨`•.•´¨) from the
(¨`•.•´¨)¸.•´ Heart
 `•.¸.•´ ~DEANNE~
. . . psst, don't forget to check out my {PIN}spirational Challenge Blog !

Friday, February 15

Big Thanks!!!

 Here's a project I did today.
This is a box of chocolates I got yesterday for Valentine's Day.
I couldn't bear to throw the box away!
I had to alter it!

Here's how to do it.

You will need:
~Chocolate box
~12 x 12 piece of patterned paper
~Utility knife (optional)
~Glue
~Paintbrush
~Distressing Ink (optional)
~Embellishments of choice

 1. First things first! Open the box and EAT THE CHOCOLATES!!! Don't leave any! Don't even think about putting the chocolates back into the box after either!

2. Carefully take the box apart.

 3. Cover the box with glue and use a paintbrush to spread the glue around. Be sure to get glue especially along ALL the edges so the paper will stick

4. The box will fit on the patterned paper nicely. Use a brayer to be sure the paper adheres well to the box. This is not really necessary but makes the job way easier. Try and place it on the paper so you can get some bigger pieces left over to use with embellishments or use on other projects.
Waste not, want not!!!

5. Let it dry for a few minutes, then carefully cut it out, being sure not to cut your bigger areas too much.
 
Here are the scrap pieces I had left over

6. At the places where there is a slot, cut with a utility knife. Or you can use scissors to do this.

6. Fold on edges and distress the edges, if you like.

7. Carefully put it back together. It's ready to put a gift in. But NOT the chocolates, 'cause they're all eaten!!!

After I embellished it, here's what it looked like.

Thank You Gift Box

Challenges:
~Eureka-swirls and pearls
~Tammy's Scrapin Corner-handmade embellishment (butterfly)
~Flutter By Wednesdays-love (and a butterfly)
~Crafty Catz-BINGO (pearls, die cuts, ribbon)
~Fairytale-set of something (includes a card-see pic at top of post)

Thanks

Challenges:
~Scrap Creations-BINGO (pearls, die cuts, ribbon)
~Crafting for all Seasons-color inspiration
sundae brights 
 ~Charisma Cardz-anything goes
~Craft Us Crazy-favorite...die cut is my butterfly die cut
~Alphabet-A is for anything with wings
~Daring Cardmakers-butterflies
~Joyful Stamper-inspire me Fridays
~Raise the Bar-anything goes
~Basic Grey-your favorite diecut (butterfly)
BG paper is Out of Print

(¨`•.•´¨) Hugs
  `•.¸(¨`•.•´¨) from the
(¨`•.•´¨)¸.•´ Heart
 `•.¸.•´ ~DEANNE~
. . . psst, don't forget to check out my {PIN}spirational Challenge Blog !

Thursday, November 1

Gift Box

This month at SPARK YOUR CREATIVITY is again {anything goes}
Here's what I created. I love recycling! I used a burger box I got a Wendy's and covered it and ,voila, I had a cute gift box!
 
 
 This is the box.
 
I carefully opened it up.
 
 I covered it with glue.
 
I laid it on top of the paper and rolled it with a brayer.
 
 Then I let it dry thoroughly and cut it out.
 
I put it back together and this is what it looked like.
 
I decorated the box and added a gift.


Check out the challenge and play along.
There's a prize being offered-a mini clothespin banner kit from Pin and Tack Handcrafted Designs.

Challenges:
~Unstampabelles-recycle or repurpose
~Kenny K's-anything but a card
~Crafty Boots-tag
~Anything Goes-anything goes
~Party Time Tuesdays-anything goes
~Through the Craft Room Door-anything goes
~Twisted Tuesday-anything goes
~Decorate to Celebrate-something for a surprise party
~Fab N Funky-diecuts and punches
~My Mum's Craft Shop-bold and bright
 
(¨`•.•´¨) Hugs
  `•.¸(¨`•.•´¨) from the
(¨`•.•´¨)¸.•´ Heart
 `•.¸.•´ ~DEANNE~
. . . psst, don't forget to check out my {PIN}spirational Challenge Blog !

Total Page Views

I watched it live! April giving birth to Tajiri!!

I watched it live! April giving birth to Tajiri!!
April 15,2017

I watched it live! April giving birth to Azizi!

I watched it live! April giving birth to Azizi!
March 16, 2019- Oct 27, 2020 RIP April RIP Ap 2 2021